
The gaming channel
The magazine
Is the place over?
The PlayStation 5 Memory Expansion Guide 5
After updating the system that allows to install an external SSD drive and expand the space, we installed and tried the XPG GAMMIX S70 Blade on the console.
All steps of the installation process
Tags
Gaming
PlayStation
SSD
Dudi Krihali
Wednesday, 10 November 2021, 20:00 Updated: 20:07
Share on Facebook
Share on WhatsApp
Share on general
Share on general
Share on Twitter
Share on Email
0 comments
PS5 SSD (Sony)
So after about a year since the launch of the next generation technology giant console from Japan Sony and millions of consoles sold around the world, last September a version update was released for the home game console operating system that brings with it the news many PS5 owners have been waiting for: SSD drive support The console.
So if you too have installed the Sound of Duty Warzone on top of your shiny new console and noticed that you have room for three more games (barely) and have not heard of the option, or may have been a little apprehensive about the "complicated process", then I'm happy to inform you of the console designers There at Sony they designed the device so that the process would be accessible even to people who are the first time they install any SSD drive (like me for example), and with the right choice of SSD drive, you can also achieve exactly the same performance as the internal SSD memory that came with the console.
Here you will find a guide on how to install the SSD drive you purchased for your new console, and then I will share with you my gaming experience after I installed the impressive drive from XPG.
More on Walla!
The invention that makes a revolution for the visually impaired belongs to middle school students
To the full article
(Photo: Walla !, Gaming Channel System)
So about three weeks ago I got the
XPG SSD drive - the Gammix s70 Blade.
A specially designed drive to fit the dimensions, and fit quite perfectly to the technical data required to use an SSD drive on the PS5 console, while experiencing exactly the same performance compared to the console's internal memory. The version I received from the company, came with 1TB of memory, and a heat sink is included in the product packaging.
So before we start explaining how we assemble the SSD on a console, it's important to know a few things that are particularly basic: you can find a wide range of drives that fit the console, and the drive I got to use is not the only one. In addition, it is very important, as instructed by the company itself, in order for the component to work in smooth synchronization with the rest of the console, and so that it does not create a "bottleneck" that will choke the business, when we play long hours on the console .
Therefore, when you look around the network for relevant drives, it is better and even recommended that the drive you buy comes with a cooling system, unless you are experienced in the field and have no problem ordering a third-party heat sink from Amazon or Eli Express.
And to the process itself - when we remove the SSD drive and heat sink from the product packaging, we must first connect the two.
Usually, the two will come detached, and on top of the heat sink we can find a double-sided adhesive, with the help of which we can connect the two parts.
(Photo: Walla !, Gaming Channel System)
(Photo: Walla !, Gaming Channel System)
Once we have connected the drive to the heat sink, we must lower the right side of the device body, in order to reveal the location of the drive compartment.
After disconnecting the Sony from power and all connections,
be careful not to leave a disc inside the disc drive
- this may lead to scratches and damage to the game disc.
After disconnecting we will place the console on its left side, and grab both ends of the console from its right side, and push upwards, with a little force.
Once we have lowered the right shell of the console body, we will be able to see the particularly massive vent of the console fan, and right next to it, a white and metallic rectangle.
This is the SSD drive bay we are looking for.
(Photo: Walla !, Gaming Channel System)
(Photo: Official website, gaming channel system)
(Photo: Walla !, Gaming Channel System)
Now, we need to lower the rectangular metal body, using a fairly standard Phillips screwdriver that will probably be dropped off at our house somewhere, and then we will uncover the drive compartment itself.
(Photo: Walla !, Gaming Channel System)
In front of our eyes we can see four empty screw holes, and a top screw hole with the number 110 to which the feed ring is attached, and the screw we will use to connect our new drive to the Sony.
Now you must carefully unscrew the screw from the threaded hole 110, and keep the screw and the metal ring to which it is attached.
Please note:
When you disconnect the screw and ring, keep the screw and the ring and make sure that they do not accidentally fall on the console fan opening, which can ruin the entire console, and this is a malfunction that is not covered under warranty!
(Photo: Walla !, Gaming Channel System)
After disconnecting the screw and feed ring, we must take the feed ring and place it in the appropriate place for the drive we have, in the case of the drive I was privileged to use, the appropriate connection was the fourth connection (80).
And now we've got to the most central part of the process: connecting the SSD drive to the console.
We need to take the drive, with the heat sink attached to it, and tilt it at a certain angle so that it fits inside the connecting strip at the bottom of the drive bay.
(Photo: Walla !, Gaming Channel System)
Once you have inserted the drive and heard a kind of faint click, you must pin the drive down so that the threaded ring sits exactly on top of the drive connection hole.
(Photo: Walla !, Gaming Channel System)
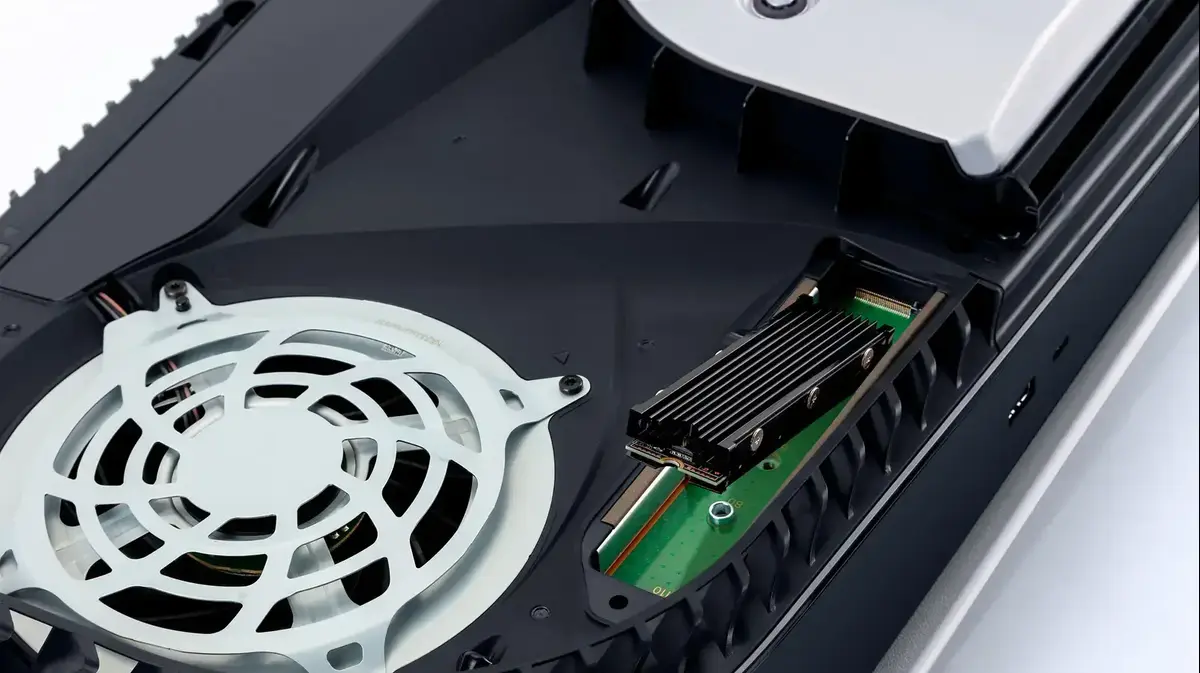
Now, grab the screw we set aside at the beginning of the process, and screw it into the screw ring so that the drive is screwed as tight as possible, and that's it!
At the end of the process, the drive should look like this.
(Photo: Walla !, Gaming Channel System)
Now all you have to do is plug the SSD drive bay protector back in, plug the right side of the console back in, and turn on the device.
When the device turns on, you will go through the boot stages of the drive at the end of which you can start installing all the games that you had to delete in order to play the newest titles.
(Photo: Walla !, Gaming Channel System)
Improved memory and new console life
And let's move on to my user experience with the drive I used, the XPG GAMMIX S70 BLADE: According to all the findings available across the network, this is perhaps one of the highest quality drives currently on the market for drives for Sony's next generation console.
The XPG drive can read information at 6100 megabytes per second when connected to the PlayStation 5. According to the company's website and data released by Sony, it's 6 megabytes more than requested, so you can rest assured that the drive's performance is above average and in the tests I performed. I can confirm that these are indeed the findings.
When I played games available to me like Spider-Man: Miles Morales, Ratchet & Clank Rift Apart, Deamon Souls and many other titles the drive managed to deliver almost identical performance compared to those games when installed on the console's internal memory.
In some cases the games even ran better on the drive, and in other cases, the games loaded a few seconds later relative to the internal memory, so overall, the games installed on the S70 Blade run quite perfectly relative to the "original".
When you take into account the average price of the drive -
NIS 899
, including the heat sink, this is a pretty excellent price and even cheaper by at least NIS 100 compared to the offer of the competitors in the form of Samsung and Western digital.
In conclusion
If you feel that your console needs a little (or a lot) more space and you have decided that you want to expand the memory of the PlayStation 5, the XPG GAMMIX S70 BLADE is a highly recommended drive.
It delivers performance that does not fall short of the drive that comes with the console itself when running the games at a relatively cheap price to competitors.
Even if you have not previously experienced installing an SSD drive, it is a fairly simple process, which just requires patience, and closely following the instructions that will ultimately give you a little more breathing space when it comes to games available on your PlayStation 5 console.
Share on Facebook
Share on WhatsApp
Share on general
Share on general
Share on Twitter
Share on Email
0 comments