
The destination of a light is indicated on its packaging (living room, bedroom, kitchen, bathroom, etc.).
The class distinguishes between luminaires which must be earthed (class 1), those for which this is not necessary (class 2) and those which, operating at very low safety voltage (SELV), are not connected to earth and can be installed in a kitchen or a bathroom (class 3).
To discover
Garden: watch out for ticks!
Step 1: Install the anchors
The suspensions are hung either on a hook present in the ceiling, or using a mounting bracket supplied with the luminaire.
In a plasterboard false ceiling, like here, get expansion plugs, of the Molly type, which can support up to 25 kg of load each, and an expansion clamp.
Switch off the power supply at the general panel, mark the location of the holes and drill with a drill/driver equipped with an 8 mm concrete drill bit.
Insert the pegs and use the pliers to lock them.
Read alsoDefective workmanship: what recourse?
Step 2: attach the support without forcing
Screw the luminaire fixing plate to the ceiling using the screws supplied with the metal expansion plugs.
Use your screwdriver with a moderate torque (screwing force set between 10 and 12).
If the hook risks interfering with the operation, do not hesitate to remove it by unscrewing it.
Read alsoHow to choose the right drill?
Some fixings, like the one used here, are, in fact, equipped with a hook to temporarily suspend the luminaire during installation.
Our chandelier being classified 1, it must be connected to the ground wire (green and yellow) by pinching it using the screw washer present on the metal support.
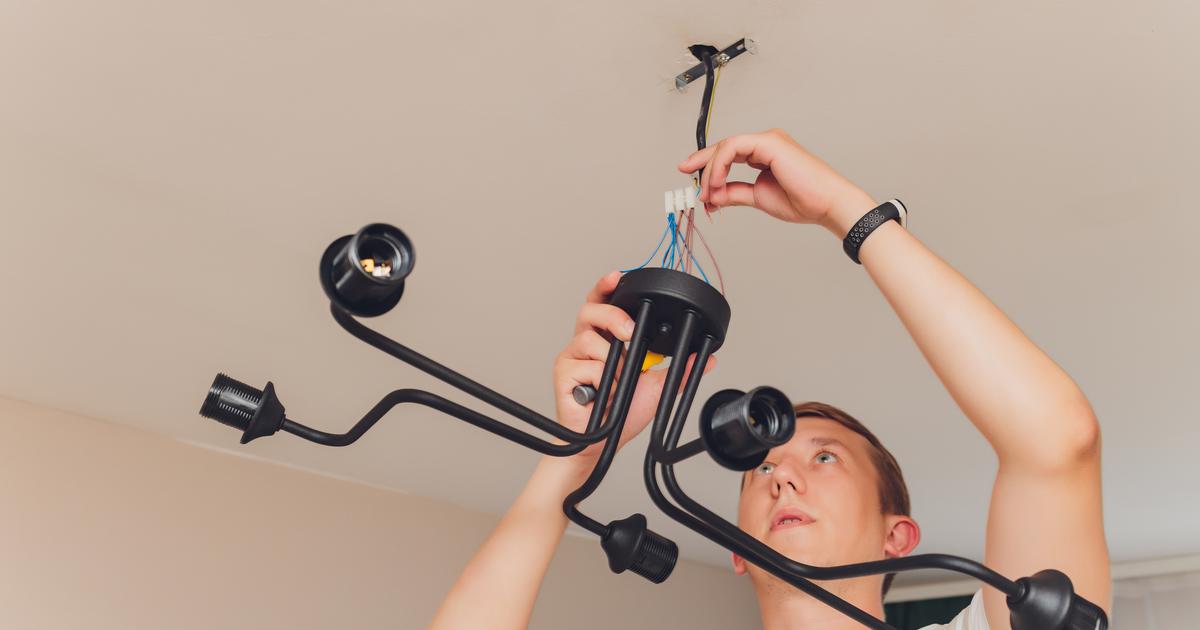
Step 3: connect the electrical wires
Hang your light on the hook with its temporary suspension cable, then locate the two remaining electrical wires: neutral and phase.
According to the French standard (NF C 15-100), the neutral is always blue.
This makes it possible to distinguish it from the phase wire whose recommended color is red.
But this one can be any other color, except blue, of course.
Once the wires have been clearly identified, use connection terminals to connect those of the ceiling to those of the suspension: the neutral with the neutral, the phase wire with the phase wire.
Read alsoAre you well lit in the office?
Step 4: install the rosette of the luminaire
When your chandelier is plugged into the electrical circuit, turn it back on to test that the lighting is working properly.
Then turn off the power again (still at the main panel) to complete the installation.
Flatten the rosette to the ceiling and fix it to the support using its screws.
These do not require high clamping force.
Use a screwdriver rather than a screwdriver to avoid damaging your ceiling with the machine.
Our opinion
Installing a light is very simple.
Depending on its class (1, 2 or 3), there are only two or three electrical wires to connect and it usually takes no more than 10 to 15 minutes.
If the suspension weight is high, you should get help.
One will maintain the lighting while the other will take care of connecting it.
Always be sure to disconnect the power supply from the electrical circuit to work in complete safety.
SEE ALSO
- Selling real estate: a whole strategy