vehicle
Car News
Everyone Can: Car Wheel Replacement Guide
Enough to be afraid of this black circle in the trunk, wheel replacement is a simple and easy process that anyone can perform.
This is the complete guide on how to do it and some tips that no one has revealed to you
Tags
Tires
wheel replacement
Fancher
Instructions
Keenan Cohen
Monday, 29 November 2021, 16:41 Updated: 17:03
Share on Facebook
Share on WhatsApp
Share on general
Share on general
Share on Twitter
Share on Email
0 comments
We may be repressing it, but someday it will happen to everyone - a flat tire.
And it will never be in this moment that you say to yourself "Wow, how will a puncture fit me now ..." It will always be on the way to a meeting, when you are nicely dressed and going to a wedding, on a trip when the trunk is loaded with equipment, in the dark, in the rain - you get the point.
And replacing a wheel in a car is a really very simple story, if you ever replaced a light bulb in the house - you can probably overcome that too.
Indeed, most people no one, ever bothered to teach how to do it right but no less important - how to do it safely.
Because even if it seems to you that you know, here you will come out with some important tips.
More on Walla!
Winter weekend on the road: 10 tips for winter driving
To the full article
Get to know the spare wheel, location, type and set of tools (Photo: Keinan Cohen)
1. Knowledge is power
The first thing you need to understand about punctures in your car is what you have in the car when it comes to handling them.
In the vast majority of cars the relevant accessories will be under the trunk floor.
There are vehicles where the spare wheel is at the bottom of the vehicle from the outside and it is necessary to lower it from the facility - check which method is used in your car.
There are three solutions offered by car manufacturers in case of a flat tire: a full replacement wheel, a compact wheel or an inflation kit.
A full spare wheel, takes up more space and weighs more - but the only one that provides a complete solution (Photo: Keinan Cohen)
The full wheel is a tire for everything, identical in dimensions to those of the rest of your tires. This is the ultimate solution as it allows for tire replacement and uncompromising ride. Its disadvantages: it takes up more space in the trunk, weighs more and needs to check the air pressure in it (although you can settle for one for half a year or a year, but still). The compact wheel, also known as a "pretzel", is a small tire, usually made of solid rubber that takes up less space in the trunk and weighs less, but is not a real substitute - it is limited in its travel distance (usually only 50 km) and the maximum speed allowed. (Usually up to 80 km / h). It is very important - if you use it, always prefer to put it in the back, even if it means switching between the normal rear and front tires - this is due to its lower grip and damage to the steering. The third and worst solution is the inflation kit. It is the most economical in weight and where it takes up space, but it is hard to say that it can be relied upon in an emergency of a puncture. personally,I recommend to anyone whose car is equipped with such a kit to be equipped with a suitable full replacement tire, if not for routine times, then at least before long journeys.
Small replacement tire, limited in distance and travel speed (Photo: ShutterStock, ShutterStock)
The second point is the toolkit that is available to you.
The basic components of the kit will be the jack, the wheel wrench and the wheel wrench extension rod - we will expand on these later.
Do not forget even if the warning triangle and the glowing vest.
A little tip that you will thank me for - disposable gloves.
You have a glove compartment, so finally put in what is important to have in it - 2-3 pairs of disposable gloves.
Right: Elevator (jack), key for nuts, rod for operating the elevator and tool bag (Photo: Keinan Cohen)
2. Do I have a puncture?
What to do?
There are several indications that you have a tire problem. This can come in the form of a bulb warning of air pressure loss that will appear on the dashboard in some cars, it could be unusual noise from the tire itself, vibrations in the steering wheel, "pulling" the vehicle in a certain direction or a combination of all these together.
The first thing we need to understand after we have identified a puncture condition is where to stop. Unless a Formula 1 team is at your disposal, repairing and replacing a wheel is an action that takes quite some time. We will always strive to stop where we can work comfortably, we will not interfere with traffic and most importantly we will not endanger ourselves and the passengers. If you are on a highway and can reach a gas station, stop bay or the nearest exit reduce speed, turn on the distress lights and keep driving as far as possible. The price of a tire that will be completely destroyed is void in the sixties compared to the risk.
If you had to stop at the side of the road be sure to do so where there is a field of vision, place the warning triangle and wear the glowing vest.
If there are passengers in the vehicle, if possible remove them and place them beyond the guardrail or curb.
If you have a feeling that the situation is still a risk, call the police, report your location, a traffic van will arrive and secure you in terms of visibility and traffic.
Gloves - do not take up space and are always useful (Photo: Keinan Cohen)
Can I get help?
Although this guide is intended to teach you to change a wheel, but do not always get along, under time pressure do not always remember how and what - do not hesitate to ask for help.
A driver who passes by and will be happy to lend a hand or one of the road services such as those of Netivei Israel (2120 *), Netivei Ayalon (8541 *), Road 6 (6116 *) or the wonderful "Friends" association (1230 - without an asterisk) In addition, you can also call To the police.
Standing on a slope?
Use stone to secure the vehicle, the spare wheel can also be used for this (Photo: Keinan Cohen)
4. Safety first
So after we have chosen the best stopping place, one can approach the repair itself. The first thing we will do is unload the wheel replacement kit and make sure we have all the appropriate tools. Next, we will secure the vehicle, make sure it is in P position, the handbrake is raised (you will be surprised, but when pressed people tend to forget). If the vehicle is on a slope, it is also advisable to place a large stone in front of the opposite wheel diagonally to the one being replaced. For example: if we replace the right front wheel, say before the left rear wheel. If there is no stone, the replacement wheel can be used for temporary security and after the defective wheel is disassembled, switch between the two.
If the vehicle is in a clear area, or you can secure it in another way, place the spare wheel under the vehicle near the point where you place the lift. Thus, if the vehicle falls, it will land on the wheel and not on the brake plate, which will damage it and make it difficult for you to lift it again. After disassembling the punctured wheel - switch between the two.
When the vehicle is on the ground, the initial release can be used on foot (Photo: Keinan Cohen)
5. Release of nations
When the vehicle is still on the ground, using the wrench, we will make an initial release of the screws (release the thread to the left, counterclockwise).
The reason they do this when the vehicle is on the ground is to produce a better "contra" as long as it is "locked" on the road and the weight of the vehicle pushes it there.
If necessary it is possible to step with the foot to apply more force, we will do this on the tip of the wrench to produce more torque.
This is what the place looks like, under which we will place the elevator, get to know it in your car (Photo: Keinan Cohen)
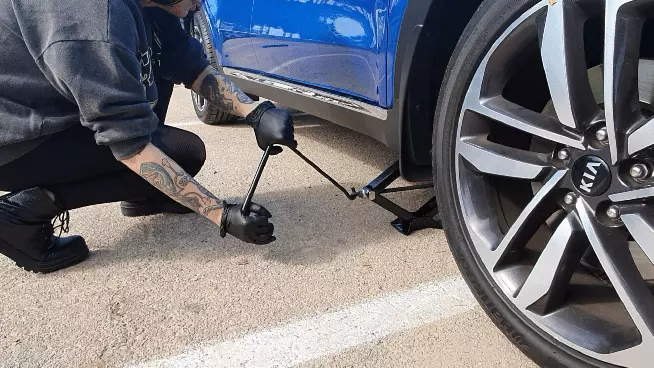
6. Lifting the vehicle
After the initial release we will lift the vehicle, but before that, we will find the designated and precise position for the lift (jack) at the bottom of the vehicle. It can be seen in the form of two defects in the car floor beams and if you do not find them, look in the car book where the elevation point is. Improper positioning can also cause damage to the vehicle and more importantly, cause it to not be properly stabilized when lifting.
In most cars the lift is done as follows: After positioning the lift, thread the rod with the hook at the end to the designated hole in the lift and to it attach the handle we used to loosen the screws with its thick part the "box" facing out, ie to you. In this way a kind of "Manuela" is created that allows one hand to be held in the thick part, while the other hand holds the rod with the hook - so that it serves as a hinge, allowing for a quick and efficient rotation of the lifter.
The vehicle should be lifted to the extent that it allows the wheel to be removed, avoid excessive lifting in order to remain as stable as possible.
Such a grip will allow the production of an "axis" and will facilitate the work (Photo: Keinan Cohen)
7. Release already
After the vehicle is raised the final release of the nuts can be accessed using the wrench.
After you have released all the nations comes the important moment - where to put them.
Well, by no means on the floor.
The last thing you want is to finish the replacement and then realize that during the work you kicked them and go look for them now in the dark.
Put them in the pocket, inside the vehicle or in the pouch of the tool set.
Final release of the wheel nuts when the vehicle is in the air (Photo: Keinan Cohen)
After releasing the nuts the wheel can be removed and replaced with a position under the vehicle or secured with the replacement bracelet and reassembled.
Are you trying to loosen the wheel and it is "stuck" on the navel?
Do not kick it, it will not help, do not hit with a stone on the hoop, it will destroy it.
What you do is take the spare wheel and use it to hit the top or bottom of the tire on the stuck wheel, a good hit or two will be enough to release it from place.
Nuts on the floor will scatter and get lost - put them in a safe place (Photo: Keinan Cohen)
8. The family of the crusaders
After assembling the replacement wheel (Tip: place the knee below the wheel position and rest the wheel on the thigh, which will allow you to use your hands to precisely adjust it to the screws on which it is worn), we will retighten the screws to fix the wheel with initial hand tightening.
The method of returning the screws is by crossing (see photo) in order to avoid a situation in which the hoop is fastened on one side and loosened on the other side, but is evenly fastened to the surface.
By the way, if at this point you found out that because you did not listen to the tip of the nuts, they were lost and you have no way to tighten the wheel - you can disassemble one nut from each of the other three wheels of the car and use them to tighten the replacement wheel - note that this is only an extreme solution And should be used only until you reach the first place where you can complete nuts.
Use the hip as a base for the wheel, so you can use your hands freely in the more delicate direction (Photo: Keinan Cohen)
9. We came to download
After wheel placement and initial tightening, the vehicle can be lowered back.
The lowering is done in the same way as raising, threading the handle with the hook, mounting the rod of the wheel wrench and turning to the other side.
After the vehicle is on the ground, use the wrench to perform a final tightening of the screws.
Again, similar to the initial tightening - in the crossover.
Unlike opening the screws - perform the final tightening with the hands and not with the foot - which can cause over-tightening and even damage.
The fastening order - always at the cross (Photo: Keinan Cohen)
10. Continuing with the routine of life?
not really no.
In the first stage, after we have collected all the tools and loaded them neatly back to where they came from, you can start driving - but with at least the first few miles to make sure everything is OK - try to hear unusual noises, feel vibrations or any sign that the wheel is not installed properly.
After a few miles stop at the side safely and make further tightening to the nations if necessary.
Remember even after the wheel replacement the event does not end until you arrive at the tire shop and repair or replace the faulty wheel.
This is not something that can be postponed to next week or when you have time, it should be done immediately, you do not know when you will need it again.
Share on Facebook
Share on WhatsApp
Share on general
Share on general
Share on Twitter
Share on Email
0 comments